
Professor Sprout's Organic Soil Mix Recipe - Updated 2026
- Professor Sprout
- Feb 1, 2024
- 14 min read
Updated: May 13
Due to frequent customer requests, I am now posting my custom soil mix recipe. I’ve spent many years tweaking and refining this mix in order to get the absolute best from my buds and seeds. I am finally confident enough in this recipe that I can guarantee that if you follow this exact method, you will get the absolute best bud possible from your organically grown Cannabis. This recipe checks all the boxes: big yields, outstanding resin production, supreme potency, and of course, mouth watering flavour and terpene production. Water is all that is required from start to finish, with a little Epsom salts and sugars added here and there to boost your results.
If you’ve read my big experiment on What Causes Black Ash in Cannabis?, you’ll know that I was plagued with poor burning, nasty tasting, and low quality ash in my buds for many years; so much so that I dedicated an entire grow to testing multiple soil mixes and bottled nutrients just to figure out how I could get the best burn quality and flavour possible. I am pleased to tell you that this recipe below has given me, hands down, the best quality smoke out of any nutrient and soil mix I’ve ever tried. What’s more, this recipe will cost you pennies on the dollar compared to bottled nutrient programs and premixed bagged soils, and the icing on the cake is that you will be able to recycle this soil mix over and over again, improving it with every single grow.

This complete recipe makes 24 gallons of soil, which is approximately one standard sized Rubbermaid garbage can filled to the brim.

Ingredients:
Base Mix
10 gallons Promix HP with Mycorrhizae
2 gallons Earth Worm Castings or 2 gallons compost (*we use our own special 'layer cake' homemade compost -recipe at end of this post)
12 gallons of Coco Coir (this won’t be added until the very end, just before you plant)
Nutrient Mix
Feather Meal - 150ml
Blood Meal - 150ml
Alfalfa Meal - 500ml
Kelp Meal - 150ml
Fishbone Meal - 500ml
Mineralized Phosphate/High Phosphate Bat Guano - 150ml
KMAG (Pelletized) - 250ml
Oyster Shell Flour - 250ml
Glacial Rock Dust - 150ml

Macro-Nutrient Ratios AKA NPK Ratios
The following ratios are approximate and can change depending on the brand of dry nutrients you use:
2.9 Nitrogen - 4.5 Phosphorous - 3.2 Potassium - 13 Calcium - 1.23 Magnesium - 2.3 Sulphur - 0.22 Iron
These ratios are highly tailored towards the nutrient demands of the Cannabis plant. A lot of research has gone into creating this recipe in a way that all the nutrients work synergistically with one another, while also providing the exact level of macro and micro nutrients that Cannabis needs to reach its true potential. For example, excess calcium can cause magnesium deficiencies, and excess potassium can cause phosphorus deficiencies, so in order for these elements to work with each other they need to be supplied in very exact amounts. For more information see Mulder’s Chart of Antagonistic Elements.
Important: In order to provide a surgically precise balance of nutrients in this soil recipe without causing any lockout conditions, it will be necessary to feed your plants once a week with a dilute mixture of epsom salts and molasses (more on that later). This minor inconvenience will be well worth the additional effort as your buds will reach far greater levels of terpene and resin production while flavour will also be dramatically enhanced. This small addition of magnesium sulphate and sugar is the key to bringing this entire soil blend into perfect alignment.

Mixing Instructions
Extremely Important Note: Use a painters mask when mixing the raw amendments into your soil mix as the dust they create can be extremely irritating to the lungs. Additionally, some of the biological materials such as bone and blood meal are unhealthy to get in your eyes or mouth.
Start by blending all of the dry amendments listed above together (Feather Meal through Glacial Rock Dust) in a medium sized bucket. Once you have combined all the fertilizers you will want to mix everything together with a wooden dowel or other implement. This will ensure a much more even blend of the nutrient charge and reduces the chances of ‘hot pockets’ of unmixed concentrated fertilizers in your soil.
Once the dry nutrients are thoroughly homogenized, you can then measure out 10 gallons of Promix HP in a wheelbarrow or other large container. Fluff up the Promix HP well with a shovel, ensuring to break up any compacted bits. Run gloved hands through the Promix and crumble up any smaller hard pieced you find. To this, add 2 gallons of well-rotted compost or earth worm castings to the Promix HP and mix together thoroughly. This will make up your soil base. Coco Coir will be added much later at the time of planting.
Using a measuring cup, add one cup of the previously mixed dry nutrient blend to your soil base, one cup at a time, by evenly distributing it over the entire surface area of your soil (be careful not to let it blow away in the wind as you spread it over the soil) and mix thoroughly before adding the next cup. If you dump all of the dry mix into the soil base at once you will likely end up with hot pockets in your soil, even if you mix it well. So, sprinkle, mix, sprinkle, mix etc.
Mix, mix and mix some more. When you think it is mixed enough, mix it again.
We use a cement mixer to make this process a little easier when we are mixing up large batches of soil. We measure out the dry amendments into a bucket and mix thoroughly with a bamboo stick first. Next, we measure out the Promix HP and Compost into a wheelbarrow, toss it up a bit, and then tumble in the cement mixer for a few minutes. Finally, we add the dry nutrient blend a little bit at a time into the cement mixer to ensure everything is evenly distributed and let it run for 15 minutes while we go work on the next batch.
Composting Your Soil
At this point you have a soil blend that is pre-digested and not yet ready to be used for planting. The organic amendments along with the bacterial and fungal cultures supplied by the compost and the Promix HP provide all the necessary ingredients to begin the ‘cooking’ or composting process. All you need now is moisture, warmth, and time. This step is absolutely crucial and failing to do this properly will spell disaster for your grow. The dry organic amendments must be digested by the soil microbes in order to be transmuted into a form that your plant can actually use. If you were to plant in this soil before the composting process had taken place, you would end up with major nutrient deficits due to the fertilizers being in a form that is unavailable to your roots.
Additionally, since composting is a thermogenic process, you also risk seriously burning your roots if you were to plant in this soil mix prematurley. Alfalfa meal is one of the worst culprits for this. It gets very hot when it is digested by microbes. As every farmer knows, you never put wet hay in a barn. The heat generated from the microbes consuming the complex carbohydrates in the wet grasses and alfalfa can be so intense that it can literally cause the hay to spontaneously combust. While you won’t need to worry about flaming pots of soil, it can still seriously scorch your roots.

Moistening your Soil
While simply wetting the mix with non-chlorinated water will suffice, you can supercharge this process with the addition of an aerated compost tea which will inoculate the soil with a massive amount of active microbes. By using a compost tea to wet down your soil, you will kick-start the breakdown of the raw nutrients. This will also front-load your soil with a host of cannabis friendly microbes that will form a massive army of little bacterial and fungal soldiers ready to go to work for you the moment you plant your first clone or seedling in the soil.
The level of moisture you’re looking for is what you would expect to find in a freshly opened bag of commercial potting soil. You should be able to squeeze it into a ball with your fist, but there should not be any excess moisture leaking out. I recommend using a watering can with a shower head nozzle to moisten the soil in your wheelbarrow. Pouring water into the soil with a bucket or stream will result in a mucky mess. Sprinkle the top of the soil with your watering can, mix well, and then sprinkle some more. Keep this going until the soil is evenly moist and there are no dry spots.

Extremely Important Note: Do not, under any circumstances, use chlorinated water to moisten your soil. This will kill off a large swath of the microbes in your soil and significantly increase the amount of time it takes for the composting process to take place. While it is true that chlorine can be evaporated from water by aerating it with an air pump and air stones, chloramine, which is becoming much more common in water supplies these days, cannot. Filtered reverse osmosis water is your best option, unless you have access to natural spring, stream, or well water which is even better due to the mineral content.
Selecting a “Cooking” Container for your Soil
At this point you will want to put your soil in a covered container that will retain the moisture content without drying out. While 20 gallon Rubbermaid garbage cans (which actually hold closer to 24 gallons filled to the brim) are the perfect size for a double recipe and relatively easy to handle; their one disadvantage is that if you overwater the mix it can become stagnant and anaerobic due to the lack of breathability of the container. This will proliferate harmful bacteria in the soil. You will know this is the case if your soil starts smelling like sewage. This can be avoided by dumping out the container and mixing it every couple of weeks during the composting process. This will inject fresh oxygen into the soil and allow the good bacteria to thrive. Mixing the soil every two weeks is recommended regardless of what container you choose, as this will do nothing but improve your soil. This is easy enough when doing small batches, but if you’re working with hundreds of gallons of soil like we are here at Lucky 13 Farms, it becomes an extremely time consuming task to remix the soil every two weeks. In that case your best option is fabric containers.
By using breathable 20 gallon fabric containers to compost your soil, there is far less of a risk of anaerobic bacteria proliferating. The porous fabric allows excellent oxygen exchange and reduces the need for constant mixing. When using fabric containers, you should only need to mix the soil once or twice at most during the entire process. You will still need to cover the soil with a lid to keep the moisture from evaporating, and you will also need to keep a closer eye on the moisture content than you would with the plastic garbage cans since it will dry out quicker. With fabric containers expect to add water once or twice during the cooking process, or more if you live in a very arid environment.
Cooking Time
Two months is the required length of time your soil mix will need to cook in order for adequate nutrient breakdown to occur. Some of the amendments are broken down rapidly, such as blood meal, and others, such as glacial rock dust, can take many years (which is why it is so important and beneficial to recycle your soil). The key is to allow adequate time for enough of the food in the soil to become available for use by your Cannabis plant, as well as to get past the point where the soil is physically hot from the microbial digestive process. Two months is adequate, but longer is always better.
We typically mix soil twice a year; once in September, and once as soon as our large outdoor compost pile is no longer frozen in the spring. By mixing in early September, this allows a good two months for the soil to cook before winter sets in and stops the composting process. The containers are stored in a sealed greenhouse for the winter, which does occasionally get warm enough to rekindle the cooking process off and on over the season.
Once spring arrives our soil is fully composted and ready to use for the upcoming growing season. At this point we then mix another fresh batch of soil that will cook all summer long to be ready for our indoor winter growing cycle. This allows us to have fresh soil, ready to go, at all times of the year.

Planting
At the time of planting is when you will mix your composted soil at a 1:1 ratio with fresh coco coir. The reason we don’t mix in the coco coir from the outset is to save space. The Promix HP, compost, and nutrients will compost just as well without the coco added, and then we just cut the mix 50-50 with coco at the time of planting. Feel free to add the coco at the beginning if you like; it certainly won’t hurt, but it will require you to use more and/or larger containers to store your soil while it composts.
The coco is crucial to lighten the mix: allowing better drainage, and improving oxygen exchange which reduces the chance of root rot. Without it, the Promix retains too much water. If you tend to be heavy handed with your watering can, adding a one inch layer of perlite to the bottom of your planting container will help drain away excess water that has a habit of pooling in that location due to soil compaction.
Using a wheelbarrow or other container to mix your soil, alternate adding one part of your composted soil mix to one part of coco coir. Mix extremely well until the mix is thoroughly homogenized.
Do not use this soil mix on clones or seedlings, it is much too concentrated and will likely be too strong for all but the most nutrient tolerant strains. It is recommended to use this soil at 25% strength until clones or seedlings are about 12” tall or larger. At this point you can transplant into 3 gallon containers of the concentrated mix for your vegetative growth period. Growth will be fast and lush, and depending on how large you want your plant’s final size to be, it is recommended that you transplant once more two weeks prior to commencing flowering.

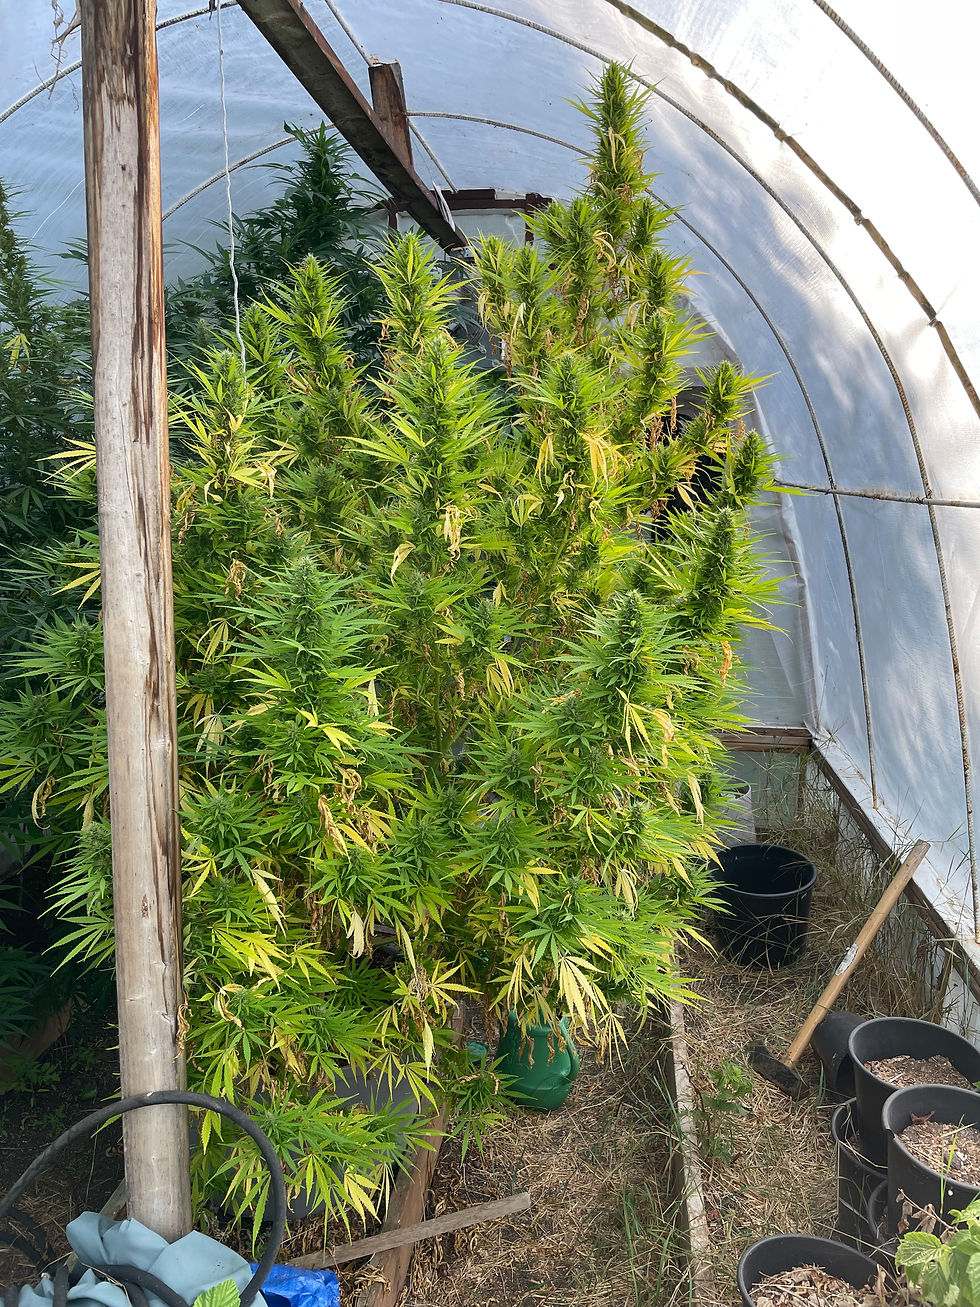
For us, that typically means we are transplanting from 3 gallon containers into 10-20 gallon containers two weeks prior to flipping the light cycle to 12:12 indoors. This allows us to fit four large plants in up to 20 gallon containers on a 4x4 table under a single 1000watt HPS light. This soil mix will provide adequate nutrients to finish most strains with a nice fade by the end of 8-9 weeks. 20 gallons of soil will give you the best results, but 10 gallon containers can be used for less hungry strains, or if you prefer to flip your plants at a smaller size. If you start in 10 gallons and find that your plants are getting root-bound, nutrient deficiencies will be sure to follow. In this case adding a healthy 4" top-dressing of fresh soil at week 4 of bloom will help carry you through the remainder of the flowering cycle. How do you know if your plants are becoming root-bound you might ask? If the top layer of soil has become so dense with roots that you cannot easily dig your hand in and remove a fistful of loose soil, then you are root-bound or very close to it.

Outdoors we prefer to transplant about three weeks prior to anticipated flower initiation from 5 gallons into 30 gallon finishing containers filled to the brim with the concentrated soil mix. Due to the accelerated growth rate of outdoor grown Cannabis, 20 gallons has proven to be the minimum size required to completely finish most strains, with 30 gallons providing the best results. You will be shocked at how fast the roots will completely fill out a 20 gallon container under direct sunlight. For slower growing strains that don't stretch much; such as Granddaddy Purple, Pre-98 Bubba Kush, or Laughing Lion, 20 gallons will suffice.

For nutrient sensitive sativas and other finicky strains like Blueberry, be aware that this soil mix is very concentrated and will likely be too hot, especially in nitrogen, for some of these less tolerant lines. In this case we like to mix the coco at 75% and the composted soil mix at 25%, while leaving enough room at the top of the finishing container to top-dress with fresh soil as needed. If by week 3-4 of bloom the plants are looking healthy and you’re not seeing any sign of nutrient burn or toxicity, go ahead and top dress with 4 inches of fresh soil.
It is also strongly recommend to add a two inch later of pure coco coir as a mulch to the top of your soil after you plant. The coco helps keep the soil moist and alive underneath, as well as creates a fast drying layer that is inhospitable to insect larvae. This will dramatically cut down on fungus gnats that breed in damp top soil.
NOTE ON PLANTING CONTAINERS: Actual sizes and volumes of planting containers vary dramatically depending on manufacturer. To allow adequate room for top-dressing, if required, and mulching, you will be better served by planting in a larger container than you need and under-filling it. This will make watering a much quicker task since a packed-to-the-brim container of soil quickly overflows when watering by hand.

Supplements and Additives For Best Results
While you can certainly use just water only with this soil mix and get incredible results, I strongly recommended supplementing with a little Epsom salts and molasses once a week or once every third watering. The Epsom salts add extra magnesium which many strains crave in abundance, as well as added sulphur which dramatically enhances terpene synthesis. The molasses provides simple sugars to feed the soil microbes which then, in turn, feed your plants. Think of this combo as an all-natural bud booster. In fact many products like Advanced Nutrients Bud Candy, or Botanicare’s Sweet are simply sugars and Epsom salts (magnesium sulphate). Check the label and see for yourself.
You don’t need much: only 1 tablespoon of Epsom salts and two tablespoons of molasses dissolved in 5 gallons of water once a week. Just make sure to use warm water to ensure they dissolve completely.
If you want to kick things up a notch further, you can use my special ‘Black Gold Bud Booster’ mix using a few inexpensive ingredients to really amplify nutrient absorption and microbial life in your soil, and thus resin and terpene production along with increasing yields and overall plant health and resilience.

Final Thoughts
Organic Cannabis grown this way is sure to be some of the absolute best bud you’ve ever tried. The level of potency, aroma, and flavour you get from growing in soil is simply head and shoulders over synthetic, salt based nutrient programs. That’s not to say you can’t achieve incredible results with bottle nutrients, because you absolutely can. But there’s something about the taste and effect of properly grown organic cannabis that just can’t be denied. I hope you’ll take it upon yourself to mix up a batch of My Professor Sprout’s Organic Soil mix and see the difference for yourself.
*Layer Cake Compost Recipe
3 parts maple leaf litter
1 part grass clippings
1 part used soil
1 part kitchen compost
The secret to our homeade compost is using the layer cake method combining maple leaf litter, grass clippings, kitchen compost, and used soil. The maple leaf litter provides excellent carbon, nitrogen and calcium while breaking down rapidly and attracting earthworms. The kitchen compost contains egg shells, vegtable chaff, bits of shredded cardboard, and fruit scraps which supply a complete and diverse spectrum of nutrients. Grass clippings supply even more nitrogen, while the used soil innoculates the compost with all of the benefial microbes we've spent the season proliferating in our soil mix.
We build a large pile about 10ft x 10ft and layer in the order listed above, but for the average home grower using a black plastic composter will work best and will break things down much faster.
-Professor Sprout


Hey ya Professor Sprout, I'm Tim.
Lovely write up. I too am a living soil guy.I think this is a nice write up and I have been looking for a tailored mix for a single photo..looks like this will do nicely thanks✌️🙏 I'll add a cpl things like a fungal component within the compost since I'll tailor mine too similarly to yours. Thanks for your time n dedication Professor ✌️👌🙏
Tim
I want to follow these instructions precisely but I have a few questions. After planting should I still use non chlorinated water?
I was wondering what the homemade recipe for 2 gallons of compost is or if its a trade secret? My third question is how long i should expect the vegetative state to last after transplanting the 1 foot sprouts into 3 gallon full strength mix. How big should I let it get before transplanting into a full sized container again 2 weeks before changing the light cycle?
Do you have any recommendations for amending this mix for the next grow or just toss and make new?